Notify
With a notification rule, people learn by email as soon as someone uploads a new file into the folder. On the Notify tab you decide who receives the email (sub-tab Automatic notifications) and with which text (sub-tab Texts).
Administrators and users with the permission Create/edit folders for assigned groups can set up rules. Only administrators can change the texts. Users with the Notify permission can read them. To report a single file that already exists by hand, see sending a notification.
Setting up a notification
- Open the Notify tab and then Automatic notifications.
- Select Activate.
- Choose the recipients:
- All users in folder: everyone who reaches the folder.
- Custom: only the people you tick in the list below. The field Search for name or mail... filters the list.
- Click Save rule.
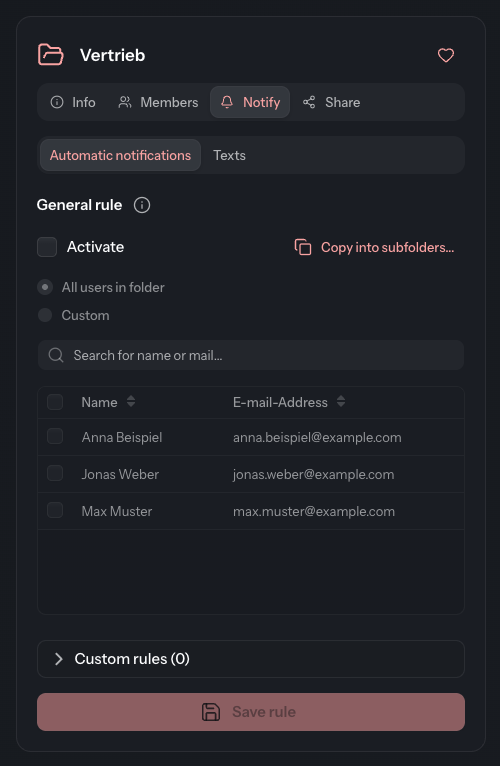
The rule applies to every new file in the folder, no matter who uploads it. The express upload field triggers it as well. If you clear Activate, your settings are kept, but nothing is sent.
If the folder's members change often, choose All users in folder. A custom list does not grow with the folder: someone who joins later gets no email until you tick them.
Deactivated accounts never receive a notification. If the rule currently cannot reach anyone, the tab shows the hint “This rule currently notifies nobody: none of the chosen recipients can receive a mail.”
Copying the rule into subfolders
- Next to Activate, click Copy into subfolders....
- In the dialog, select the subfolders that are to get the same rule.
- Click Copy into subfolders... in the dialog.
The DocSecBox first saves the current rule and then copies it. The copy is a one-off: a later change here does not travel to the subfolders by itself. Subfolders that you may not edit, or in which the chosen people are not assigned, are skipped. A message then states in how many subfolders the rule arrived.
A rule of its own for one person
You can decide who is notified when one particular person uploads. Such a rule replaces the folder's general rule for that person.
- Below the recipient list, expand the section Custom rules (…).
- Click Add.
- Under Trigger, choose the person whose uploads trigger the rule.
- Choose the recipients: All users in folder or Custom.
- Click Save.
The rule applies immediately; Save rule is not needed for it. The list shows the Trigger, the Recipients and their Count for each rule. Select a row to change it with Edit or to delete it with . Copy into subfolders... is available here as well.
Customising the texts
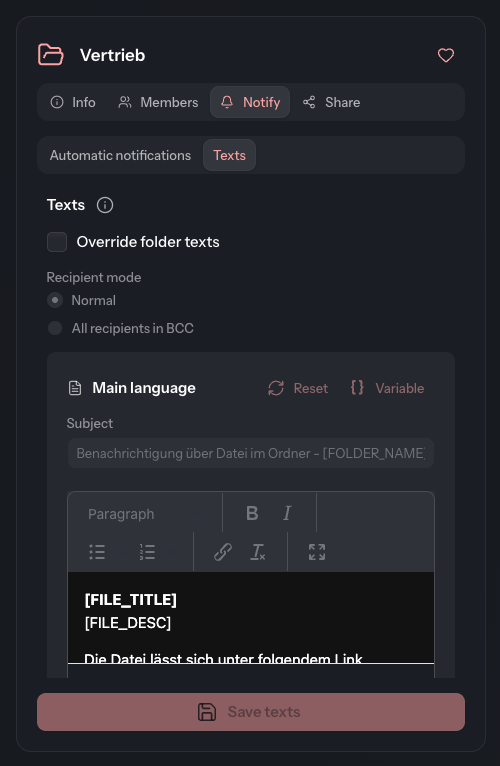
Without texts of its own, the folder sends the master template that your administrator maintains under E-mail. You see it greyed out on the Texts sub-tab. This is how you give the folder texts of its own:
- Open the Texts sub-tab.
- Select Override folder texts.
- Adjust the Subject and the text for both the Main language and the Foreign language.
Variable inserts a placeholder, such as
[FILE_TITLE]or[FOLDER_NAME], that is replaced when the email is sent. - Click Save texts.
| Control | Meaning |
|---|---|
| Recipient mode | Normal puts all recipients visibly into the email. All recipients in BCC hides them from one another. |
| Visible recipient in BCC | Appears with All recipients in BCC and must be filled in: the address shown visibly in the recipient field. |
| Reset | Brings the master template's text back into this language. It is only stored with Save texts. |
Both languages need a subject and a text, otherwise saving is refused. Your administrator decides which language is the main language. To return to the master template, clear Override folder texts and click Save texts. The folder's own texts are deleted in the process.
See also
- Sending a notification: report a single file by hand
- Members: who reaches the folder
- E-mail: the master templates